 |
How to build your automatic meteor camera setup
What you need is at least one Canon T-70 (or T-90). This camera is being used very succesfully since 1985 by our members.
The Canon T-70, 35mm reflex camera with build-in automatic film trans- port works on two penlight (AA) batteries (no power drain when shutter is opened). For this type of camera an attachable Command Back 70 is available which allows to program the exposures of the camera.
One Command Back equiped camera can trigger several other cameras. You can get the signal for automatically triggering more Canon T-70 (or other Canon camera's) from the flash socket or directly from the T3 adaptor. If you use the flash socket you will have to take into account a time delay of 1 second after the master camera has trigge- red. If you use the T3 adaptor you will have no time delay, but you will have to isolate your connector perfectly (otherwise your system will run wild!).
Using a Command Back equiped T-70 to control other T-70 cameras works perfect. If you want to use it to control other cameras (e.g. Canon AE-1), you have to prepare an electronic system for that purpose and you might experience problems with connectors, power supply to shut- ters and winders etc. It will always be those other type cameras that will cause the problem, not the T-70. If you want the highest reliabi- lity of your automated camera setup, don't even consider other camera types than the Canon T-70: it simply is the best available!
(Note: The Canon T-70 is not the only camera capable for this purpose. It has a bigger brother called T-90 which (with a command back 90) knows the same trick).
 |
Now some more details on the T-70 trigger system.
First the T3 connector. There is a build-in connector in the grip of the T-70. This is the T3 connector. Canon has two attachable cables available for it:
- The T3 adaptor (T3 male -> female 2,5 jack plug)
- The T3 electronic release cable (T3 male -> 2-way (lock) release button)
TRIGGERING o o GROUND (higher in the
socket)
o ACTIVATING MEASURING (same as having the release button pressed
down).
We have used three different systems in the past, but I find the latest version (system 3) of the system most excellent.
System 1:
Developed by Hans Betlem and Koen Miskotte (1984).
Use the trigger signal (make/break contact) from the Command Back equiped
T-70 flash socket to trigger an electronic relais that will send a ma-
ke/break signal to the T3 adaptor of the other T-70 cameras, or to activate
a constant power supply that will open/activate the shutters of other type
cameras (e.g. Canon A-1, AV-1, AE-1 or similar). System used since 1985,
currently still operated by Hans Betlem.
System 2:
Developed by Robert Haas (1989) and currently
occasionally still operated by Casper ter Kuile (Delphinus, old station
1). Use the trigger signal (make/break contact) from the Command Back equiped
T-70 flash socket as a make/break signal to the T3 adaptor of the other
T- 70 cameras. Only two other T-70 cameras can be connected to each commanding
T-70 (otherwise the make/break signal will fade and the setup will not
work reliably), so for a larger setup (more than 3 cameras) you will need
more than one Command Back equiped T-70.
System 3:
Developed by Robert Haas (1996, with the upcoming
campaign on the Leonid meteor storms in mind), succesfully used in the
1997 Perseid and Leonid campaigns and the 1998 Lyrid campaign by Delphinus
stations 1 and 2.
This is a very tricky one, but if constructed
and used correctly it is by far the most reliable system.
Connect the T3 adaptor from the Command Back
equiped T-70 to a closed signal ring, BUT MAKE SURE THAT THE TWO MAIN CONNECTOR
RINGS CAN NEVER IN ANY WAY CONNECT. The triggering signal will be enhanced
by all T- 70s and without any delay all shutters will be triggered exactly
at the same moment. In principle, one Command Back equiped T-70 is able
to trigger 100 other T-70's in this way! The big advantage is that no other
power supply is needed.
THE BIG EXTRA ON SYSTEM 3:
Just every camera in the signal ring can trigger
the other cameras if it is equiped with a command back. So by including
TWO Command Back equiped cameras in the ring, you can switch to a different
exposure programm in just two seconds by switching off the first Command
back (programmed, say, to take 10 minute exposures) and then switching
on the second (which thus takes over from the first, and can be programmed,
say, to take 1 minute exposures in intervals of 10 minutes).
 |
To cover a considerable part of the sky using 50mm focal length aperture (smaller focal lenghts reduce the measuring quality of the exposures considerably), you need at least three setups, which are in our case usually:
- ZENITH SETUP: 4 x T-70 with 1.8/50mm Canon FD lenses;
- MID-SKY SETUP: 7 x T-70 with 1.8/50mm Canon FD lenses;
- LOW-SKY SETUP: 9 x T-70 with 1.8/50mm Canon FD lenses.
EXPOSURE TIME 9 MIN 58 SEC INTERVAL TIME 2 SEC [the safe transport time of a T-70] TOTAL EXPOSURES 36
* In case of meteor storm (system 3 only):
EXPOSURE TIME 1 MIN 58 SEC INTERVAL 5 MIN TOTAL EXPOSURES 36 [the short exposure time avoids negatives filling with meteors, creating identification problems for multi-station orbital calculation purpo- ses. The 5 minute interval creates samples of activity each five minutes].
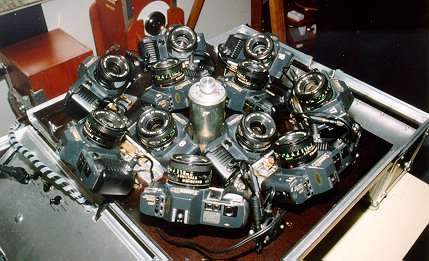
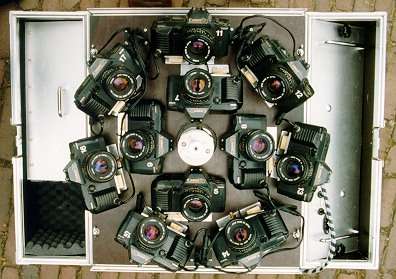
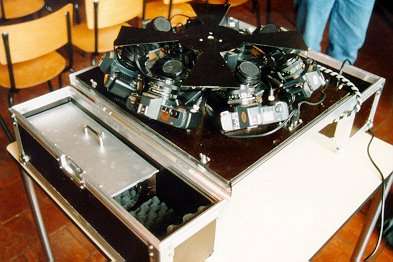
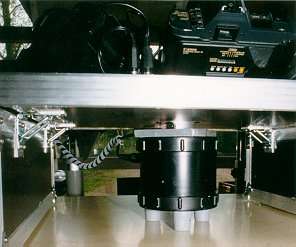
Hereby some pictures of DMS Delphinus' newest pride: a clever version of system 3 which COMBINES TWO SETUPS (the MID-SKY and ZENITH) IN ONE! Some believed something as compact like this could never be build. It consists of a combined high and middle array of cameras controlled via system 3, under one rotating shutter for speed determination (four blades, producing 50 breaks a second, crystal controlled). By combining an inner high-aimed camera ring (4 x T-70) looking outward and an outer lower aimed ring of cameras (7 x T-70) looking inward I made a very compact T-70 array of 11 cameras surveying the sky from zenith to 25 degrees altitude. The advantage is that it is a very compact, easy to transport setup. It is thus constructed that it takes only seconds to get it operatio- nal. When transported to the observing location, the whole systemn is tightly packed in a flight case. Releasing two clamps unfolds the whole system, and then only the electro-motor for the rotating shutter has to be placed correctly in the setup and the shutter blade screwed to it. It takes only 1min20sec to go through this whole procedure, and then the setup runs with the flick of one switch!
 |
Text: Robert Haas, English by Marco Langbroek